

Any plain piece of fabric sitting in your stash can become something you actually want to sew with. Learning how to dye fabric is really learning a handful of different skills, ranging from a weekend tie-dye kit you can finish before lunch to a slow, photographic sun-printing process that borrows chemistry from the 1800s. In between there’s solid-color dyeing, ice dyeing, shibori, fabric painting, block printing, and custom digital printing, each with its own tools and learning curve.
Before you buy a bottle of dye, it helps to know what your fabric is made of. Natural fibers like cotton, linen, and silk take color the most readily and hold it the longest, while synthetics need special handling or don’t accept dye at all. If you’re not sure what’s on your cutting table, our guide to fabric types walks through how to identify a fiber, and our sewing fabrics overview covers the fiber basics that make all of this work.
Some links below are affiliate links. Prices are 2025-2026 estimates and change often, so always check current pricing.
Know Your Dyes First
Every technique in this guide starts with the same question: what is your fabric made of, and which dye actually bonds to that fiber? Get this wrong and no amount of careful technique will save the result.
| Dye type | Works on | How it works | Water temp | Washfastness | Notes |
|---|---|---|---|---|---|
| Fiber-reactive (Procion MX class) | Cellulose fibers: cotton, linen, hemp, bamboo, rayon; also silk | Covalent bond, chemically bonds into the fiber (permanent) | Cold to lukewarm, roughly 70-105F, no heat needed | Highest of the home dye types, doesn’t fade with normal washing once reacted | Needs a soda ash activator (1 cup per gallon warm water, 15-20 min presoak). The standard for tie-dye, ice dye, and hand-painted work. |
| All-purpose (Rit class) | Cotton, linen, rayon, nylon, and cotton/poly or nylon blends | A blend of dye types in one bottle, convenient but less permanent | Hot water, near-simmer, or the hottest your washer or sink can hold | Lower than fiber-reactive; expect gradual fading and some crocking without a fixative | Easiest to find anywhere. Add 1 cup salt for cotton/linen or 1 cup white vinegar for nylon/silk. Follow with Rit ColorStay Dye Fixative to cut fading and bleeding. |
| Acid dyes | Protein fibers: wool, silk, other animal fibers, plus nylon | Ionic bond set by acid (vinegar or citric acid) plus heat | Stovetop, near-simmer for wool/feathers, just below for silk; gradual heating matters for wool so it doesn’t felt | High when properly acid- and heat-set | Roughly 1 cup vinegar (or 1 tbsp citric acid) per pound, added partway through. Doesn’t work on cellulose, cotton stains only faint and washes out. |
| Disperse dyes (Rit DyeMore for synthetics) | Polyester, polyester/cotton blends, acrylic, acetate | Heat-transfer, dye disperses in near-boiling water and diffuses into the closed synthetic fiber under sustained heat | Stovetop only, just below boiling, about 180F, for the full dye time | Moderate to good once set; double the dye amount for 100% polyester or bold color | The real, practical home answer for polyester. Prewash first (no softener), keep fabric in the bath at least 30 minutes, then rinse warm to cool and wash mild. |
Match your dye to your fiber content, not the other way around. A fiber-reactive dye will barely tint polyester, and Rit DyeMore won’t do much to 100% cotton. With a blend, dye the dominant fiber and expect a lighter result on the rest.
One more thing worth knowing: you cannot dye a dark fabric a lighter color. Dye only adds color, it can’t remove it. The only way to lighten fabric is to strip color first with a dedicated color remover or careful bleach treatment, and even then results vary and it can weaken the fibers. Always test on a scrap first.
Safety and Prep
None of these techniques require a hazmat suit, but dye powder and soda ash are genuinely irritating to breathe and stain everything they touch, so a few habits make the whole process easier and safer.
- Use dedicated equipment for dyeing (pots, spoons, measuring cups, tubs) and never return them to food use afterward.
- Wear a dust mask or respirator any time you’re measuring or mixing dye powder or soda ash. The fine particles are the main irritation risk.
- Wear gloves throughout, work in a ventilated room (open windows, run a fan), and cover work surfaces with old towels or plastic sheeting. Dye stains permanently.
- Prewash or scour your fabric before dyeing to strip sizing and finishes that block even dye absorption.
- For fiber-reactive dye, presoak the fabric in a soda ash solution, about 1 cup soda ash per gallon of warm water, for roughly 15-20 minutes, then wring out the excess before applying dye.
Solid-Color Dyeing (the Tub Method)
This is the most basic technique and the one that teaches you the most about how dye actually behaves. It’s also the fastest route to a plain colored yardage you can then cut into a pattern.
- Match your dye to the fiber content using the decoder above before you buy anything.
- Fill your container with enough hot water that the fabric can move freely. Crowding the bath is the number one cause of blotchy, uneven color.
- Dissolve the dye completely in a small amount of hot water first and strain out any undissolved granules before adding it to the main bath.
- Wet the fabric fully before it goes in the dye bath so it absorbs color evenly from the start.
- Add the fabric and stir slowly but constantly for the first 10-15 minutes. This window determines whether the color comes out even or splotchy.
- For Rit all-purpose dye, add 1 cup of salt for cotton or linen, or 1 cup of white vinegar for nylon or silk, partway through to help the dye take.
- Keep the fabric in the bath anywhere from 15 minutes to an hour depending on how deep you want the shade, stirring occasionally throughout.
- If you’re dyeing polyester with Rit DyeMore or another disperse dye, you’ll need a stovetop bath held just below boiling, about 180F, for at least 30 minutes.
- Lift the fabric out and rinse in warm water, gradually stepping down to cold, until the rinse water runs clear.
- Optional: run the fabric through a Rit ColorStay Dye Fixative bath before the final rinse to reduce bleeding and fading.
- Wash the piece separately from other laundry for the first several washes, in cold water with a mild or textile-specific detergent.
Tie-Dye
Tie-dye is where most people start, and for good reason: it’s forgiving, fast, and nearly impossible to get completely wrong. Presoak your fabric in the same soda ash solution described above, about 1 cup soda ash per gallon of warm water, for 15-20 minutes, then wring out the excess before folding and binding. That presoak is what activates fiber-reactive dye’s permanent bond, so don’t skip it.
Spiral. Pinch the center of the fabric and twist until the whole piece coils into a flat disc, then secure it with rubber bands running across it like slices of a pie so you can dye each wedge a different color.
Stripes / Accordion. Accordion-fold the fabric in even pleats, horizontally, vertically, or on the diagonal for chevrons, then band the folded strip at intervals before dyeing.
Bullseye. Pinch the center and pull the fabric straight up into a cone shape, then wrap rubber bands every few inches down the length of the cone to create concentric rings.
Crumple. Bunch the fabric randomly into a loose pile with no particular folding and secure it with a few rubber bands or string, the most forgiving pattern for total beginners.
Once your fabric is folded and bound:
- Apply dye with squeeze bottles, saturating both sides and all exposed folds and creases fully.
- Wrap the dyed, bound fabric in plastic (a bag or plastic wrap) and let it sit 8-24 hours in a warm spot so the dye has time to fully react and bond.
- Rinse in cold water while still bound to flush out surface excess dye, then unbind and keep rinsing until the water runs clear.
- Wash separately in hot water with a textile detergent like Synthrapol to strip any unbonded dye before it goes anywhere near other laundry.
Ice Dyeing
Ice dyeing looks complicated in photos but the process itself is almost hands-off, which is part of the appeal.
- Set a wire rack over a tub or bin to catch the melting ice.
- Scrunch, twist, or loosely fold soda-ash-soaked, damp fabric onto the rack. More texture in the fold creates more color variation.
- Cover the fabric completely with ice cubes, or snow if you have it.
- Sprinkle dry dye powder directly over the ice. Do not pre-dissolve it, the powder needs to travel through the melting ice on its own.
- Let it sit undisturbed for about 24 hours in a warm spot while the ice melts and carries the dye down through the fabric.
- Rinse in cold water until it runs clear, then hot wash separately with a textile detergent.
The reason ice dyeing produces those watercolor-like bursts instead of one flat shade comes down to chemistry: most dye “colors” are actually blends of several individual dye molecules, and those molecules travel through the melting ice water at different rates based on their size and solubility. A single-hue pure dye splits far less than a mixed color does. Snow works the same way as ice and sometimes melts more slowly and evenly, giving even more separation.
Shibori
Shibori is the Japanese umbrella term (from “shiboru,” to wring, squeeze, or press) for resist-dyeing by physically shaping fabric, folding, clamping, binding, or stitching it, before it goes in the dye so the bound sections resist color. Each of the four core techniques below produces a distinct look.
Itajime. Accordion-fold the fabric into a flat shape, square or triangle, then clamp it tightly between two boards, blocks, or cut shapes held with rubber bands or string. The clamped areas resist dye and produce repeating geometric patterns.
Arashi. Wrap the fabric diagonally around a pole, scrunch it tightly down the length of the pole, then bind it by winding thread up and down before dyeing. This produces thin diagonal lines that look like driving rain, which is exactly what “arashi” (storm) refers to.
Kanoko. Pinch small sections of fabric and bind each tightly with thread or a rubber band, working across the whole piece. The tighter the bind, the more the fabric stays white, creating small circle and dot patterns closest to Western tie-dye.
Nui. Sew a running stitch through the fabric in your chosen pattern, then pull the thread tight to gather and pucker the cloth (a wooden dowel helps pull it tight enough), and knot off each thread before dyeing for fine, controlled lines.
Traditional shibori is dyed in a fermented natural indigo vat, where the fabric oxidizes from green to blue as it hits the air on each dip, a process that takes real practice to maintain. You don’t need an indigo vat to try shibori at home, though. Beginners can get the same resist patterns with ordinary cold-water fiber-reactive dye instead, using the soda ash presoak covered earlier in this guide.
Fabric Painting
Dedicated fabric paint already contains binders that keep it flexible and washable on cloth. Plain acrylic paint dries into a stiff plastic film that can crack on fabric unless it’s mixed with a textile or fabric medium, roughly 1:1 acrylic to medium (check the specific product’s ratio), which is effectively what pre-made fabric paint already is. For tools, reach for brushes for detail work, sponges or foam applicators for texture and blending, stencils for repeatable motifs, and fine-tip fabric markers for linework.
- Prewash the fabric first to remove sizing that can block paint adhesion.
- Slide cardboard or a board inside garment layers so paint doesn’t bleed through to the back.
- Apply the design in thin, light coats to avoid excess stiffness, and let it dry completely.
- Heat-set with a dry iron on the reverse side (or under a press cloth on the front), medium-high heat, moving constantly for about 3-5 minutes. Check the product label since times vary.
- Let the piece cure fully, at least 24 hours and ideally about a week, before the first wash.
Because paint sits on top of the fiber and coats it, it works on any fiber type, including synthetics and blends, which dye can’t reliably do. The tradeoff is a slightly stiffer hand on the painted areas compared to dye, which soaks in and keeps the fabric’s original drape. When it’s time to wash a painted piece, turn it inside out, wash cold on a gentle cycle with mild detergent, and hold off on that first wash until the paint has fully cured, 72 hours minimum, up to a week for best durability.
Block Printing
Block printing gives you the most control over a repeatable, precise design of any method here, and it doesn’t require a liquid dye bath at all.
- Draw your design in reverse onto a soft-cut or lino block (mirror text and asymmetric shapes), then carve away the negative space with lino cutting tools, leaving the design raised.
- Prewash and iron the fabric flat to remove sizing, then lightly mist it with water from a spray bottle. The added moisture helps fibers accept the ink.
- Use a dedicated fabric block-printing ink (oil- or water-based textile ink, not paper printing ink). Squeeze a line onto a tray and roll a brayer through it until it’s coated in a thin, even layer.
- Roll the inked brayer over the raised surface of the block until it’s evenly covered.
- Press the block face-down onto the fabric firmly and evenly, standing over it and leaning your weight on, or running a brayer or rolling pin over the back, without rocking or sliding it.
- Lift the block straight up in one motion to avoid smudging the print.
- For repeat patterns across yardage, use registration marks (pencil guides or a light grid) to keep spacing consistent between prints.
- Let the ink dry fully, then heat-set with an iron on the highest heat the fabric tolerates, about 3-5 minutes per side under a press cloth.
If you’ve got kids who aren’t ready for carving tools, potato halves or found objects like sponges and bottle caps work as simple stamps using the same inking and pressing technique.
Cyanotype (Sun Printing)
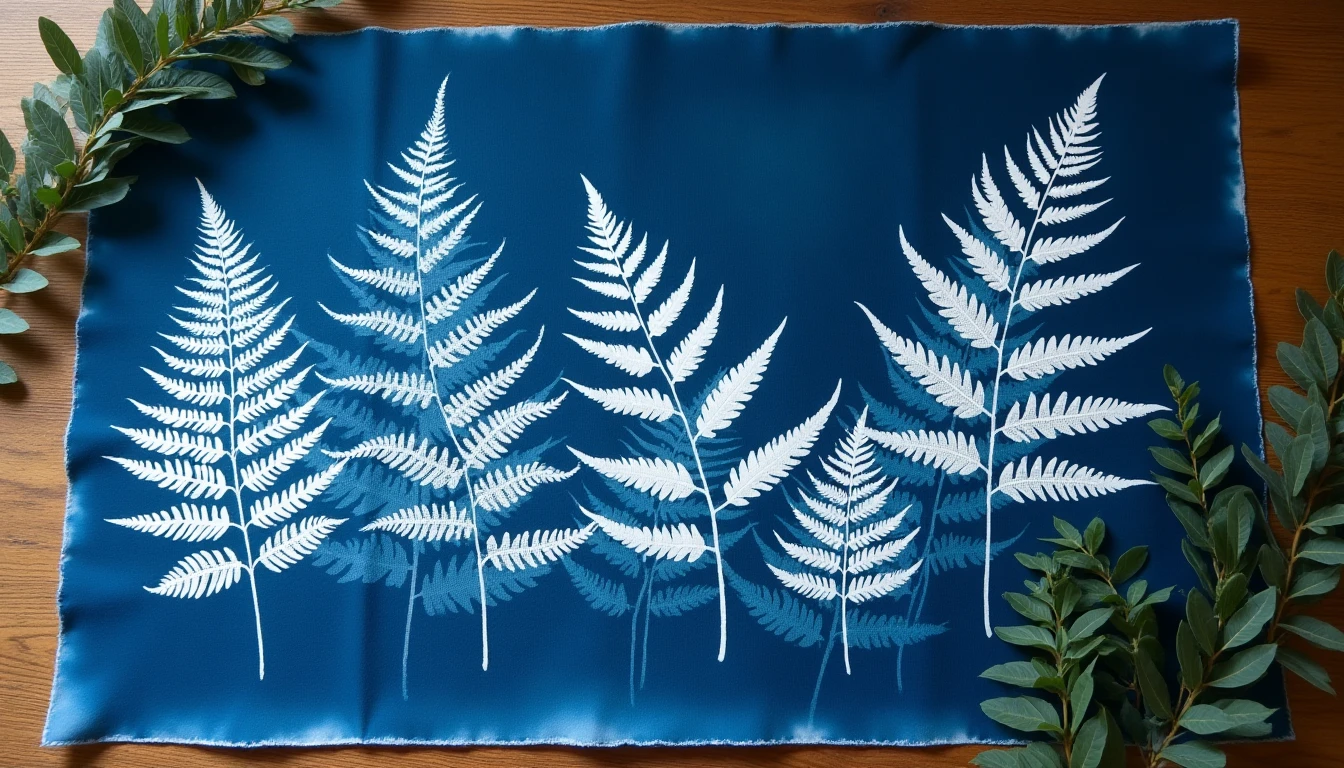
Cyanotype is the odd one out here because it isn’t dye or paint at all, it’s a photographic process. Discovered in 1842 by Sir John Herschel, it uses UV-sensitive iron-based chemistry to turn fabric a deep Prussian blue wherever light reaches it, while objects laid on top block the light and leave white or light silhouettes behind. Fern fronds, lace, and pressed flowers all work well.
There are two ways in. Buying pre-treated cyanotype fabric or a kit is easiest, no chemical handling required, ready to expose straight out of the package. The more involved option is mixing and coating your own using ferric ammonium citrate and potassium ferricyanide, applied in dim indoor light away from UV, then dried fully in the dark for about 24 hours and stored in a light-proof bag until you’re ready to expose it.
Once your fabric is coated (or you’ve unwrapped your pre-treated piece):
- Arrange botanicals, lace, stencils, or found objects on the coated fabric.
- Lay a sheet of clear acrylic or glass over everything to hold it flat and in full contact with the fabric.
- Set it in direct sun. With fresh, properly mixed chemistry, a bright summer midday exposure typically takes about 5-20 minutes.
- Overcast days, weaker sun, or winter light stretch that considerably, often to 30-60 minutes or more.
- Judge by the fabric’s color shift, not the clock. Exposed areas turn from yellow-green to a grey or bronze tone when they’re ready.
After exposure, rinse in cool running water until it runs clear, this rinse is what develops the blue. An optional dip in a highly diluted hydrogen peroxide bath (a few drops of 3% peroxide in a basin of water) speeds up oxidation and deepens the blue instantly, instead of waiting several days for it to darken naturally in air.
It’s worth being honest about the limits here. Cyanotype only works on natural fibers, cotton, linen, silk; synthetics won’t take the chemistry. Prints also fade with frequent washing and heavy sun exposure, so this technique suits decor and low-wash items better than everyday garments: quilt blocks, pillows, totes, patches, and framed pieces, the kind of seasonal and holiday sewing projects that get admired more than washed.
Custom Digital Printing
Sometimes what you want isn’t a color or a resist pattern at all, it’s a specific, repeatable design: a photo, a logo, a matched print across several yards. That’s where custom digital printing services come in.
Spoonflower is the best-known print-on-demand fabric service. You upload your own artwork and have it printed to order on dozens of fabric bases. Contrado and similar services (such as Fabric on Demand) offer comparable upload-and-print options on different fabric bases and pricing structures.
- Upload a design file (JPG or PNG; size and resolution limits vary by service, up to 40MB on Spoonflower).
- Choose a fabric base and set the scale or repeat of your design.
- Order a swatch first, around $5 on Spoonflower, to check color accuracy and print quality before committing to yardage.
- Order the full amount by the yard once you’re happy with the swatch. Pricing varies by fabric type, roughly $20/yard and up depending on the base material.
For small pieces, printable fabric sheets or iron-on transfer paper run through a home inkjet printer let you print a photo or design directly onto fabric, or transfer it with an iron. It’s a cheap, fast option for patches, small panels, and one-off projects, though not practical for full yardage.
Reach for custom digital printing instead of dyeing when you need a specific, repeatable design rather than an overall color: matching a set of projects, printing a photo or memorial fabric, or getting an exact motif that dye and paint can’t replicate. Per-yard cost runs higher than off-the-shelf fabric, but you get total creative control. Either way, our guide on how to choose fabric can help you pick the right base to start from.
Caring for Hand-Dyed Fabric
However you’ve colored your fabric, the first few washes matter more than any wash after that.
- Wash hand-dyed, painted, or printed fabric separately for the first several washes: cold water, mild detergent, inside out.
- A textile-specific detergent, such as Synthrapol, helps strip any unbonded excess dye so it doesn’t transfer onto or dull other fabrics.
- Expect some slight crocking (color rubbing off onto skin or other fabric) in the first washes and wears of hand-dyed items. This is normal and fades with repeated washing.
- Long-term, wash finished pieces cold on a gentle cycle with mild detergent, dry on low heat or air dry, and limit direct sun exposure since it fades color over time, especially on cyanotype prints.
- Iron on the reverse side (or under a press cloth) if fabric needs touching up after washing, to protect paint or print surfaces.
Our full fabric care guide covers washing and caring for fabric in more depth if you want the longer version.
Once your fabric is dyed, painted, or printed and cured, it deserves an actual project instead of sitting folded on a shelf. If you need a pattern to sew it into, our 155+ printable PDF sewing patterns come with step-by-step instructions for turning custom fabric into something you’ll actually use.
Frequently Asked Questions
What is the best dye for cotton?
Fiber-reactive (Procion MX-class) dye is the best match for cotton. It’s a cold-water dye that forms a permanent covalent bond with cellulose fibers, giving the most washfast color of any home dye type, but it needs a soda ash activator to work.
Can you dye polyester fabric?
Yes, with a disperse-type dye made for synthetics, such as Rit DyeMore. It requires a near-boiling stovetop bath (about 180F) for at least 30 minutes because polyester won’t accept dye at normal water temperatures.
Do you need soda ash to tie-dye?
If you’re using fiber-reactive (Procion MX) dye, the standard for tie-dye, yes. Soda ash is what activates the dye and bonds it permanently to the fiber. Presoak fabric in a solution of about 1 cup soda ash per gallon of water for 15-20 minutes before applying dye.
How do you keep tie-dye from fading?
Let the dye fully react by wrapping and holding the fabric 8-24 hours in a warm spot, rinse thoroughly until the water runs clear before washing, wash the first several times separately in cold water with a textile detergent, and limit sun exposure afterward.
What is ice dyeing?
A tie-dye variation where dry dye powder is sprinkled onto a bed of ice covering scrunched, soda-soaked fabric. As the ice melts, the individual dye components travel through the water at different rates, creating mottled, watercolor-like color bursts you can’t get by mixing dye directly into water.
What is cyanotype printing?
A sun-activated photographic process dating to 1842 that turns fabric a deep Prussian blue wherever UV light hits chemically coated cloth. Objects laid on top block the light and leave white or light silhouettes. It only works on natural fibers.
Can I get my own fabric design printed?
Yes. Print-on-demand services like Spoonflower let you upload artwork and have it printed to order on a range of fabric bases, sold by the swatch or by the yard. For small projects, printable fabric sheets for a home inkjet printer are a cheaper DIY option.
Is fabric paint permanent?
Yes, once properly heat-set (usually ironed on the reverse for about 3-5 minutes) and given a few days to fully cure, fabric paint is permanent and machine washable. It sits on top of the fiber rather than bonding into it like dye does, so it adds a bit of stiffness.