
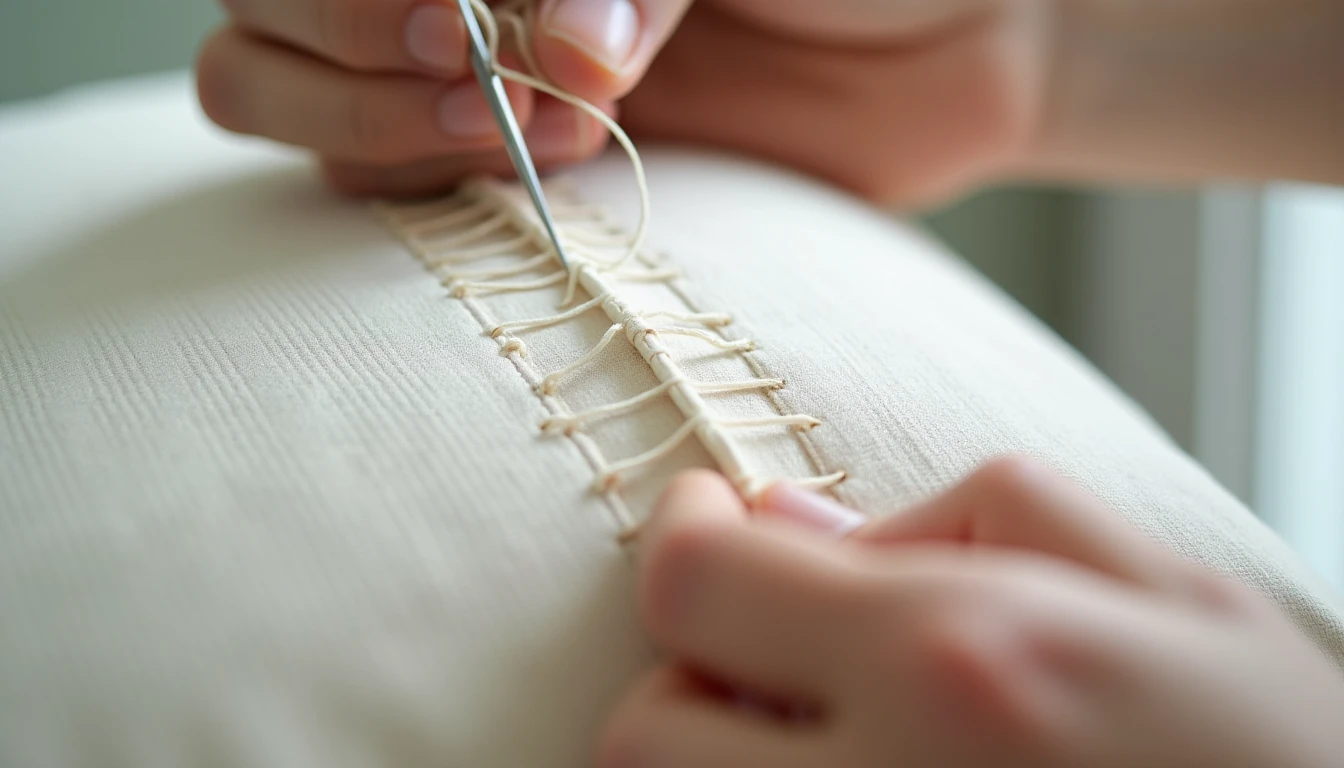
You just stuffed a plush toy, filled a pillow form, or turned a lined bag right side out, and now there’s a gap staring back at you. The machine can’t reach inside anymore, so you’re finishing this by hand. That’s exactly what the ladder stitch is for. Worked correctly, it closes that opening with no visible thread on the outside, just a clean fold that looks like it was never open. It’s one of the core techniques in our full guide to hand sewing stitches, and it’s the one you’ll reach for most once you start finishing projects by hand.
Some links below are affiliate links. Prices are 2025-2026 estimates and change often, so always check current pricing.
Ladder Stitch, Invisible Stitch, Slip Stitch: Same Thing?
Honestly, in most everyday sewing content, yes. Ladder stitch, invisible stitch, hidden stitch, and slip stitch all get used to describe the same closing technique: small, straight bites across a folded opening, pulled snug until the thread disappears. If you searched for any of those terms and landed here, you’re in the right place.
If you want the more precise version, there’s a real technical distinction worth knowing. A true ladder stitch takes even, straight bites on both folded edges directly across from each other, built to be pulled tight so the two edges cinch together, which is what makes it right for closing a turning gap. A stricter slip stitch takes a tiny bite from one fold and a slightly longer, slanted bite from the flat layer opposite it, and it isn’t meant to be pulled tight at all. It’s used for hemming, attaching bindings, and lining work where the layers are already the right length and just need tacking together.
One more clarification: blind stitch usually refers to something different, a hem stitch worked through the very edge of a single fold, the kind of thing a blind-hem sewing machine foot is designed to mimic. It’s not the closure technique you’re using to shut a stuffed animal or a pillow. For the rest of this guide, “ladder stitch” means the cinching, close-an-opening version, since that’s what most people searching this term actually need.
Thread and Needle Setup
Grab a sharp hand-sewing needle. A sharps or milliners needle is ideal because the fine point glides along the fold without catching or dragging threads out of place. A pack of good needles lasts years, so it’s worth having a few sizes on hand, like these hand sewing needles, sharps and milliners.
Matching thread color to your fabric matters more than almost anything else here. A slightly mismatched needle bite is forgivable. A bright white thread against navy fabric is not. Hold a few spools against your fabric in daylight before deciding.
For anything that gets handled, hugged, or washed repeatedly, like a stuffed animal or a well-loved throw pillow, use a doubled strand of all-purpose thread, or reach for hand-quilting thread, which is spun stronger to begin with. A single thin strand can hold for a while, but it’s the first thing to snap under stuffing pressure.
Running the thread through beeswax or a conditioner before you start is optional, but it strengthens the thread, cuts down on tangling and fraying, and helps the needle glide through fabric with less resistance, especially with doubled thread.
How to Sew a Ladder Stitch
- Press the seam allowances of the opening inward along the existing stitching line so both folded edges have a crisp, even crease. This is the single most important step in the whole process. Your needle follows this fold line exactly, and a sloppy press guarantees a visible seam no matter how careful your stitching is.
- Thread your needle with about 18 to 24 inches of matching thread, tie a knot, and bury it by inserting the needle from inside the fold at one end of the opening so it comes out right on the crease line. The knot stays hidden in the seam allowance instead of sitting on the surface.
- Take a small, straight stitch, about 1/8 to 1/4 inch, directly along the fold line. Cross to the opposite folded edge and take a matching stitch directly across from it, right on that fold line, not staggered or diagonal.
- Keep alternating sides in a straight line down the opening, always entering and exiting right along the crease so the thread tucks inside the fold instead of biting into the visible outer fabric.
- Every few stitches, roughly every three to five rungs, pull the thread gently but firmly to snug everything up. This is the moment the ladder rungs collapse and vanish into the seam, drawing the two folded edges together. Pull evenly, don’t yank, or you’ll pucker the fabric.
- Repeat the bite, bite, pull pattern until you reach the opposite end of the opening and the gap is fully closed.
- Finish with a secure knot: take a small stitch and loop the needle through it two or three times to form a tight knot close to the fabric, then bury the tail by running the needle back inside the fold, popping it out an inch away, and trimming the thread flush so the end disappears.
Where the Ladder Stitch Earns Its Keep
Closing a stuffed animal or plush toy is the classic use case, and probably why you’re here. Once the stuffing is packed in, there’s no getting a machine inside anymore, so the ladder stitch closes that gap invisibly. Keep stitches small and close together so stuffing doesn’t peek through. The same skills carry over into any project involving sewing for kids, since plush toys come up constantly there.
Pillow and cushion covers close the same way after you’ve inserted the filling, giving a clean finish with no topstitching across the front. It’s a technique you’ll use over and over in home decor sewing projects, from throw pillows to seat cushions.
Bag linings get the same treatment. After you turn a bag right side out through the gap left between the shell and lining, a ladder stitch shuts that opening without leaving a trace.
It’s also a legitimate way to mend a torn garment seam from the outside, useful when a seam splits somewhere you can’t get a machine to, like inside a narrow sleeve or a fully lined jacket. Re-press the torn edges and stitch them shut the same way you would a stuffing gap. Our guide to mending and alterations covers this kind of repair in more depth.
One clarification worth repeating: hand-finishing a hem is a different job. A true hem stitch, sometimes called a blind stitch, works through the edge of a single fold rather than cinching two folds together, so don’t reach for the ladder stitch there.
Why Yours Is Visible (Troubleshooting)
The seam puckers or bunches after closing. You’re pulling the thread too tight, or unevenly. Snug the stitches gradually every few stitches instead of yanking hard at the end, and keep tension even across the closure.
The stitches show on the outside. Your needle bites aren’t landing exactly on the crease, or the thread doesn’t match closely enough. Re-press the fold, take smaller bites (1/8 inch or less), and swap in a thread that blends better with the fabric.
The seam pulls open again later. Stitches were spaced too far apart, or the finishing knot wasn’t secure. Space each stitch closer together, about 1/8 to 1/4 inch apart, and finish with a double-looped knot, backtracking through the last stitch before you bury the tail.
Curved openings look messy. Use smaller, more frequent bites on curves than you would on a straight edge, so the fold can bend smoothly without gapping.
Thread keeps tangling or snapping on thick fabric. Switch to doubled thread for extra strength, run it through beeswax to cut friction, and take slightly larger bites appropriate to the fabric’s weight so the needle isn’t fighting excess bulk.
Ladder vs Whip vs Machine Closing
Whip stitch is faster and easier to learn, but it leaves diagonal stitches visible on the outside and can give the seam a slightly puckered look. Fine for an edge nobody will ever see, not what you want on a finished exterior seam. Ladder stitch takes more patience, but it disappears almost completely once pulled snug, which is why it’s the go-to for stuffed toys, pillows, and anything else that stays on display.
Machine topstitching the opening shut is faster and stronger than either hand method, and it’s a fine choice when a visible topstitch line already fits the project, like a casual pillow or bag where topstitching is part of the design anyway. The catch is you can’t use it once stuffing is already inside, since the machine can’t reach in, and it leaves a line that reads as sewn shut rather than seamless.
Sometimes, skip the ladder stitch entirely. For a seam that ends up fully hidden inside the project, like an internal lining seam or the underside of a cushion insert, a quick whip stitch or a few big straight stitches gets the job done faster. Save the careful, invisible ladder stitch for closures that actually show.
If you’d like more finishing techniques like this one gathered in one place, our library of 155+ printable PDF sewing patterns covers a wide range of projects worth practicing this stitch on.
Frequently Asked Questions
What is a ladder stitch used for?
It’s mainly used to invisibly close an opening by hand once you can no longer sew it by machine, most commonly the stuffing gap in a stuffed animal or pillow, a turned bag lining, or a torn seam you’re mending from the outside.
Is a ladder stitch the same as an invisible stitch?
In everyday sewing language, yes. Ladder stitch and invisible stitch, along with hidden stitch and often slip stitch, describe the same closing technique. Technically, some sewists reserve slip stitch for hems and bindings that aren’t meant to be cinched, but for closing openings the terms are functionally the same stitch.
How do you close a stuffed animal with a ladder stitch?
Press the seam allowances inward, thread a needle with matching thread (doubled or extra sturdy is best), and hide the knot inside the fold. Take small straight stitches alternating across each folded edge along the crease, pull the thread snug every few stitches, and finish with a secure buried knot once the gap is closed.
Why is my ladder stitch visible?
Usually the bites aren’t landing exactly on the pressed fold line, the stitches are too large, or the thread color doesn’t closely match the fabric. Re-press the fold, use smaller 1/8-inch bites right on the crease, and match your thread color as closely as you can.
How far apart should ladder stitches be?
Keep individual stitches small, around 1/8 to 1/4 inch, and space each rung close to the next at roughly the same distance. Tighter spacing, closer to 1/8 inch, gives the strongest and most invisible closure, especially on stuffed items that take some abuse.
Is ladder stitch strong enough for pillows?
Yes. Done with small, closely spaced stitches and a sturdy thread, whether that’s doubled all-purpose polyester or hand-quilting thread, a ladder stitch closure holds up well on pillows. For high-stress items like stuffed toys that get handled roughly, doubling the thread adds extra security.